
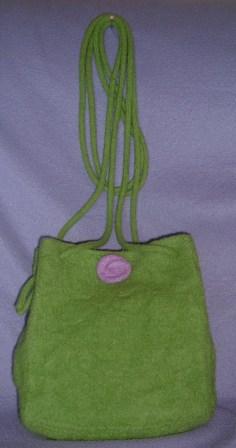
As i've had lots of requests for my free Classic Tote pattern I thought I may as well make it available on here. It's knitted in Cascade 220, available from www.getknitted.com but can be knitted in other 100% handwash only wools.
Pattern:
Finished measurements (depends on wool used and level of felting) –
Height – 9 in
Width – 8 in
Needed:
440 yards dk or aran handwash only wool (I used Cascade 220)
7 mm circular needle – 60cm or 80 cm
Magnetic snap fastening (optional)
Small amount of different coloured wool (optional) for flowers
4 Split stitch markers or safety pins
7mm crochet hook
Abbreviations:
st – stitch
st st – stockinette stitch
m1 – pick up strand between st with you left needle then knit through the back of stitch.
k – knit
K2tog – knit 2 stitches together
beg - beginning
pm – place marker
Base:
Cast on 40 st
Knit garter stitch for 39 rows.
Sides:
Leave 40 st on needle, pick up 18 st along short edge, 40 st along cast on edge, and another 18 st along the other short edge. PM on st nos 1, 40, 59 and 98. Make sure that the marker on st no 1 is different from the others so that you can tell where your round starts. Move these markers up as you knit.
Purl first round.
Knit st st until bag sides measures 13 in tall, then knit garter stitch for 1 inch.
The marked st are your corner stitches. Drop and unravel first corner stitch. When you reach the purl round, pick up your corner stitch using a crochet hook, picking up two strands at a time. This will form a more defined corner st. Once you’ve reached the top again, put the corner st back on left-hand needle and cast off until you come to next corner st and repeat as above until you reach the end of round. Fasten all loose ends.
I-cord:
Cast on 3 st. Knit an i-cord – knit 3 stitches and move back to the left needle and knit them again. Repeat this process until the i-cord is long enough – about 6 foot is about right for a shoulder strap. Knit the i-cord longer if you want an across the body strap (allow for a small amount of shrinkage).
When i-cord is finished secure both ends of the i-cord.
For video demo on how to knit an
i-cord see http://www.knittinghelp.com/ and click on techniques and find the i-cord video clip.
Flower: (optional)
Co 30 st, knit 2 rows
K2tog across row – 15 st
Knit 1 row
K2tog across row, but knit 1 st single in middle of row as you have an uneven number of st on the needle – 8 st
Knit 1 row
K2tog across row – 4 st
Cut off wool leaving a short tail. Use a thick tapestry needle and pull end of yarn through st and take them off the knitting needle. Pull yarn tight and shape into a flower and secure yarn tail.
Felting:
Put the bag inside a pillow case and close with a rubber band. Place inside washing machine with some jeans or towels. Select a short 60 degree wash, with a small amount of washing powder. Run the wash, spin on a low spin or don’t spin (spinning can cause). When programme is finished check the bag for felting. If you feel it’s not felted enough repeat the washing process until you reach desired level of felting. Usually two 60 degree short cycles are best
Place flowers and i-cords in separate small wash bags (the ones that come with your washing tablets are perfect) and wash with the bag.
Blocking:
Find a card board box about same size as finished bag (see measurements below) and stuff with carrier bags and cover it in another plastic bag or cling film. Stuff this box inside the bag, stretching the bag to fit around the box and stretch the bag to the required height. Leave to dry.
Stretch i-cord as much as possible and leave to dry.
Finishing off:
Attach the magnetic snap to the bag. Sew on the flowers or buttons to cover the magnetic snap.
Fold edges of bag and use thick knitting needles to make holes . Insert i-cord and tie ends together on the outside to the side of the bag.. You can cut the i-cord to create the perfect length.
Copyright – Anni Design, 2006 www.annidesign.co.uk
If you would like me to e-mail you a version of this pattern for free please look at my website, www.annidesign.co.uk for details.
5 comments:
Hi Anni! Posting on the forum is a good way to get people to notice your blog too ;-) I also sent links to all my family and friends when I first started and begged them to read and comment so I could feel loved :-D
Welcome to the Fiber Arts Bloggers ring! Happy surfing. :)
Thank you to both of you. I was so excited about finding some replies when I logged on. Thanks.
Hi Anni, You've done a great job with the new site. I love your classic basket and the green classic tote.
Thank you Clare. It's nearly the same colour but different brands. The tote is Cascade 220 and the Lamb's Pride Limeade (I think it's Limeade anyway). Love green at the moment.
Post a Comment